People are starting to realize the important role that kitchen lighting design plays in a successful project. With the proper lighting, your kitchen can be transformed from a culinary production facility, to a soothing place to have a drink and relax with close friends…all with the touch of a button. So what things are important to consider in your new kitchen lighting design? Here we discuss your options and share with you the lighting in our new kitchen remodel.
Lighting Types: The three basic types of lighting for your kitchen are Task, General and Indirect/Mood lighting. Each of these plays a different role in giving your space character and providing functionality and efficiency. Let’s take a look at each of these and how they fit into your new kitchen lighting design.
General Lighting: The main purpose of the general lighting is to provide the overall light needed for the space. When you make a trip to the kitchen for a drink or a piece of cake, this is the lighting you will turn on. For our new kitchen remodel and lighting design, we decided to use 4″ recessed can lights to provide a modern, clean look. The cans were placed three feet apart to provide maximum coverage, without any overlap of light. We placed the cans on a dimmer to provide energy efficiency and maximum functionality. When possible, we dial down the brightness of the general lighting to be easier on the eyes and pocket book. If you decide to go with dimmers, make sure the bulbs you use are compatible. Some compact fluorescent bulbs cannot be dimmed and can cause a fire if used with a dimmer. One of the best features of the dimmer…you can turn the general lighting into mood lighting by dialing down the light to a soft glow. Our 4″ recessed cans were about sixty bucks each including the fixture, baffle trim and bulb.
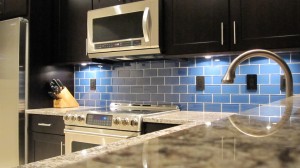
Task Lighting: These are the lights that will help you get your everyday kitchen jobs done. For your kitchen lighting design, it’s important that all countertops have some form of task lighting. For our main countertop, we used low voltage undercabinet lights. These are great because they can be hidden under your cabinets with a light rail (cabinet trim) and skin (plywood with same finish as cabinets)…so when they are off, they’re invisible. We also placed our undercabinet lights on a dimmer so we could save energy when just a little light will do. Once again, the undercabinet lighting morphs into mood lighting when we turn down the dimmer as they toss a warm glow across the glistening glass backsplash. Good times. Our undercabinet puck style lights were twenty bucks each. We spent another twenty for the transformer (which we located in the attic). Now that’s what I call affordable kitchen lighting design!
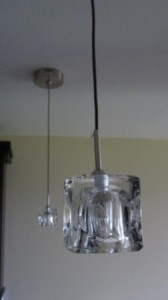
For our kitchen bar top, we went with pendant lights on a dimmer. These two contemporary pendants are located directly above the bar stool locations, centered over the countertop. With this strategic placement, the 20 watt bulbs are more than adequate and can be dialed down with the dimmer as needed. Typical pendant height is 29-32″ above the countertop to the bottom of the fixture. Trust me on this one…it will save you a lot of time. We found our ice cube pendants for our kitchen lighting design online for about fifty bucks each. They come with extra wire in case your ceiling is taller than eight feet.
Indirect/Mood Lighting: When we want to relax and transform our kitchen into a place for entertaining, we use our mood lighting. One of my favorite, least expensive ways to incorporate mood lighting into any kitchen lighting design is with low voltage over cabinet lights. These add a custom feel to the space at a bargain price. By placing a switched electrical outlet just above the cabinets out of view, we have a place to plug in an efficient LED rope light. For the material and installation, including switch, outlet, and LED rope, we spent a little over a hundred bucks. Definitely a bargain kitchen lighting design tip!
Make sure you turn on the different rope lights available to you to see which color light will work best with your space. There’s nothing worse than turning on your new mood lighting to find a stark, bright, blinding light that kills the mood and highlights the paint boogers on your ceiling. As we mentioned earlier, all of our task and general lighting was placed on dimmers so it could also serve as mood lighting. Also don’t forget to measure your cabinets…you want the rope light for your kitchen lighting design to be the same length as the run of cabinets. Otherwise, you may end up with an overlap which will give you a brighter glow in the overlap location.
Bulbs: If we lived in a perfect world, we would choose LED lighting for every kitchen lighting design in our projects. LED’s are energy efficient, provide a warm light (depending on the bulb you choose), last a long time, and aren’t harmful to people or the environment when they break (no mercury like CFL’s). Unfortunately, they are much more expensive at this time. Just like any other new product, the production efficiencies haven’t kicked in yet to lower the price to what we feel is acceptable. The prices will drop…in due time. So for now, you may want to install carefully placed standard fixtures on dimmers like we did, and eventually switch over to LED bulbs in the future. Check out the U.S. Department of Energy for more info on saving energy with different lighting/bulb types.
Switches: There are probably as many switch types as there are bulbs. For our kitchen lighting design, we decided to use rocker switches with slide dimmers. The best part about these switches…they have a slight glow to them when the lights are off in order for you to find them. You may decide to add the occupancy switches that sense when you have left the room and turn the lights off. You will probably want to check out a few of the major lighting control manufacturers, like Leviton, for all the latest stuff.
If you put a little effort into your kitchen lighting design, your new kitchen will be extremely versatile and will adapt to the occasion. Whether you need plenty of light for preparing the Thanksgiving turkey or a soft glow for a romantic evening, your well planned lighting layout will drastically increase the value of your new space. Stay turned…next week Armchair Builder will talk about good cabinet design and layouts for your new kitchen.
2 Comments for Kitchen Lighting Design
Low Cost/Big Impact Home Details- Armchair Builder :: Blog :: Build, renovate, & repair your own home. Save money as an owner-builder. | December 7, 2011 at 9:26 am
Killer Kitchen Design- Armchair Builder :: Blog :: Build, renovate, & repair your own home. Save money as an owner-builder. | December 16, 2011 at 4:49 am
[…] wanted under cabinet lighting to provide task lighting on the countertops. In order to create a custom look, we used a light […]


[…] your ability to sell when that day eventually comes. Today we share with you an inexpensive lighting detail that will give your new space a custom […]