Easy home repairs begin with knowing what’s behind the drywall. Have you ever had a water leak inside a wall and had to pay a plumber $70 an hour to cut numerous holes in the drywall to find the problem? Or, have you ever heard a ticking, sloshing or creaking sound in your ceiling and wondered what the culprit was? Even if you were around when your home was built, it can be difficult to remember where things are located behind the drywall. Wouldn’t it be great if you knew exactly where the plumbing was run in a given wall just in case you decide to hang a picture or add a door in the future? Without knowing where the mechanicals are, you basically take educated guesses and start cutting into your walls until you find something you want…or don’t want.
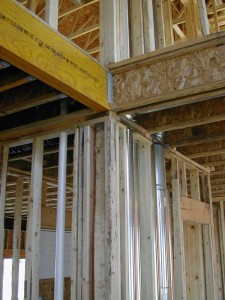
Well, I have a few simple tips that can help document plumbing, electrical, and HVAC (a.k.a. mechanicals) locations when building a new home, addition, or finished basement. First, I like to video each room so I can have a general sense of how things were run. When the project is complete and we identify a problem, we can sometimes make a diagnosis by going back to the video to see what is in the wall. This video also helps when trying to make remodeling decisions in the future. For example, you will probably want to avoid major remodeling in walls that contain electrical home runs or significant plumbing or heating. The video can also help you see what type of structural members are inside a ceiling. For example, if you have a major load bearing point coming down in the location of a future window, this will help you understand the material and work involved before you get started. Don’t forget to video underslab plumbing as you may want to add something in the future and cutting /removingconcrete is no easy task.
My next form of documentation involves marking exact locations of all mechanicals on a plan (with dimensions). You are probably saying to yourself…”But these are already on the plan”. Well, many times they aren’t on the plans and even if they are, things change frequently based on how the framing comes together in the field. Marking the plan will give you exact dimensions to the actual installed (or as-built) locations. So, let’s say you’re hanging a picture at the time of move in. You may decide to move the nail over 1/2″ in order to avoid hitting a plumbing supply line now that you know where they are.
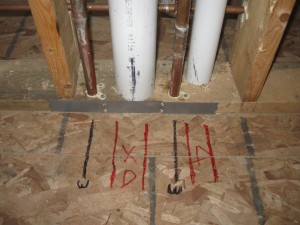
One last builder secret that can help to avoid problems during construction. I use color coded permanent markers or spray paint to mark the locations of waterlines, heat runs, speaker wires, thermostat wires, cables, phone…etc. on the subfloor at the base of each wall. This helps particularly during the construction phase as sometimes drywallers forget to cut out for an outlet or cable wire. By having the marking on the floor, we can quickly find them without cutting numerous holes in the wall. It also helps the trim carpenter avoid shooting nails into plumbing. Don’t forget to share with us any good tips you might have found while building your new owner-built project.
2 Comments for Builder Secrets to Easy Home Repairs
Annual Checklist: The Trouble Free Home- Armchair Builder :: Blog :: Build, renovate, & repair your own home. Save money as an owner-builder. | October 25, 2011 at 7:51 am
Kathyrn Hemme | November 2, 2011 at 1:42 am
Heya i am for the first time here. I found this board and I find It truly useful & it helped me out a lot. I hope to give something back and help others like you helped me.


[…] Attached is the annual checklist I have created from years of building and repairing homes. If you put down the cell phone and remote control, you should be able to go through this inspection in less than an hour. Let us know if you see any items that would be helpful to add. If you’re building a home and want a few builder secrets for easy home repairs, check out this… […]