Prevent Leaks in Your Tiled Shower
3 Comments | Posted by armchairbuilder in Bath Remodel, Fix it!, Quality Check
Because one of our readers had an issue with his tile shower leaking, I thought it would be a good idea to share it with everyone just in case you have a bathroom project coming up. If you decide to have an installer tile the floor and walls of your shower, there are some things you will need to include in your contract to ensure your shower will be water tight. You will want to include this information in writing, in any documents you and your contractor sign, so you don’t end up having to deal with the headache and expense later to do things over the right way.
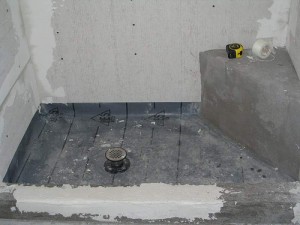
Require a Waterproof Membrane Under the Shower: If you are sure that a tile floor is the only thing you will have in your shower, you will want to require your contractor to install what is called a waterproof pan liner. This pan liner is basically a piece of rubber (or similar waterproof material) that is flexible, impervious to water, resistant to household chemicals and comes on a roll. The liner is installed on top of the first sloping mortar bed. Your installer will cut the liner to fit the shower, seal any joints, run the material up the walls for several inches (and over the curb where the shower door goes), and then secure it to the studs. The liner is then sealed to the plumbing drain to create a waterproof base. The mortar bed on top of the liner is sloped toward the drain per the industry standard of 1/4″ per foot. This prevents water from standing in the shower which would cause mold and mildew. Then, the installer will install a water resistant backer board on the walls, covering the pan liner. This will help make sure any water that gets behind the wall tile makes its way out on top of the pan liner and to the drain. The installer then applies thinset and tile. The sealed grout is the last step in the installation of your leak free shower.
Shouldn’t a Professional Contractor Already Be Doing This? The short answer is yes. However, following these additional steps add cost to the project. If you bid your project out without giving specific details on quality requirements, the contractor will probably provide a bid with the least expensive way to do the work. These additional quality measures ensure that you will have no leaks…but cost extra money in material and time. When bidding out your construction projects, be sure to include a complete scope of work that describes the specific quality measures you expect. Would you have leaks without these additional quality initiatives mentioned here? Maybe and maybe not. But if you do, you will end up with a huge headache and an additional several thousand dollar expense.
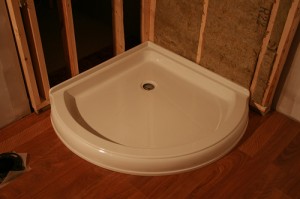
Alternatives for Leak Free Shower Floors: Another way to ensure your shower floor is leak proof, is to install a solid shower base. These bases can be made of different materials including fiberglass (least expensive) or composite marble (more expensive as it is typically custom made to fit). The most affordable option is to go with the fiberglass shower base. These are manufactured in several different sizes, colors and shapes. If you decide to go with a fiberglass shower base, you will design your shower around one of the standard sizes. Because there are no seams in the manufactured shower base, you have no chance of leaks. In order to get a leak, the water will need to either get behind the walls or get around the drain. These are both easily prevented with proper installation methods.
One More Best Practice: I like to use a solid piece of material under the shower door and glass enclosure to provide a tight, waterproof seal. By using a solid piece of granite, solid surface material or composite marble, you get a good seal between the shower enclosure frame and the smooth material. When you install a shower enclosure frame onto a tiled surface, there are gaps between the frame and the tile/mortar joints. These high and low spots make the connection and sealing of the enclosure more difficult. So, if you can find a color you like, have a piece of granite, marble or solid surface fabricated to cover the top of the curb where the shower enclosure goes. This extra quality step could save you having some additional expense and hassle down the road.
3 Comments for Prevent Leaks in Your Tiled Shower
strumenti dj | October 19, 2011 at 2:24 am
Tile leaks | Myspacelayoutw | November 8, 2011 at 2:40 pm
[…] Prevent Leaks in Your Tiled Shower- Armchair Builder :: Blog :: Build … […]
Test 2 | Problems With Leaking Shower? | December 17, 2011 at 3:25 pm
[…] are still giving off humidity (that depends on how the house is build).Powered by Yahoo! AnswersSandra asks…When I run my bathroom sink tap my shower starts leaking?Any ideas whats going on..tha…>When I run my bathroom sink tap my shower starts leaking?Any ideas whats going on..thanks When I […]
<< Add Living Space to Your Home: Converting Two Story Rooms


Hi, this is a great post! Thanks..