Water Drainage and Your Home
2 Comments | Posted by armchairbuilder in Fix it!, Quality Check, Save Money
Water Drainage Basics
Most new homes today come with an engineered plot plan showing how the water drainage should work. Each new community or subdivision comes with an overall water drainage plan designed by an engineer, showing where the storm water should go. Each lot within that community is designed to fit the overall water drainage plan. So, if a homeowner changes their individual lot drainage so it does not match the overall engineered water drainage plan, problems can happen.
Water Drainage Problem Diagnosis
So what do you do if your lot has always drained properly, now suddenly holds water. First, be sure to check any storm drains in, or near, your yard and make sure they are not clogged or covered. I know if sounds silly, but a whole bunch of water drainage problems have been fixed by merely cleaning out a storm drain. These can easily get clogged with leaves, branches, basketballs,…etc.
If your lot’s water drainage was previously working properly, and just recently started holding water, ask yourself if there has been any new development in the area surrounding your home. Maybe the neighbor re-graded their yard or installed a pool. Maybe you added a landscape bed to your yard that is impeding your water drainage. If anything has changed recently, check to see if the changes affect your engineered plot plan. If you added landscaping or other structures, make sure these don’t block the path of rainwater. Swales are depressions that are created in your yard that are pitched to remove excess water off the property. If these are blocked by fences, landscape beds, or other structures, water will not drain properly.
Solutions to Water Drainage Problems
If you can move the object obstructing the water drainage, do so. If this is not practical, you have two options to solve the problem. 1) You can re-grade the area so the swale directs water drainage around the structure. 2) You can install a storm drain or french drain to remove the water that is trapped. If you choose to re-grade the area, make sure you don’t cause further water drainage problems upstream – you don’t want to create a dam that just pushes the problem to your neighbor’s yard. If you decide to re-grade the area, you will want to use a transit or laser level to make sure your new grades don’t trap water in new places. If you want the least possible damage to be done to your existing grass when fixing your water drainage problem, go with option two, a french drain.
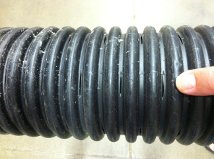
A french drain is created by starting a small trench at the water drainage problem area and pitching it to the street or to the next storm drain. This trench must be pitched to allow the water to drain properly. You will need a transit or laser level to accomplish this. Install a small catch basin at the problem area (you can buy these at your local home improvement store for $20-$30 or so) making sure the top of the basin is at the low point. Place a couple inches of gravel (or pea stone) in the bottom of the trench and then place a 4” corrugated, flexible water drainage pipe on top of the stone. Use a drain tile pipe that has slits in it to allow the water to enter and has a geotextile fabric surrounding it to keep silt from entering and clogging the pipe. 
Before placing stone around the pipe, check one last time to make sure the drain is pitched properly to allow the water that enters the pipe to flow. The end of the water drainage pipe should be capped with an end piece with holes that will prevent small animals from entering (they sometimes try and build a nest in the pipe which can impede the flow). Leave the stone down 2-4” below final grade, place geotextile fabric over the stone and then add top soil to get back to grade. Seed or sod the area as soon as possible to prevent erosion of the water drainage area. You may want to place a geotextile fabric over the drain cover to prevent dirt from getting down into your new water drainage system.
If you don’t have an engineered plot plan for your property and you want to how the water drainage is supposed to work, check with your local building department to see if they have an overall storm drainage plan for your community. They may also have a plot plan that shows the water drainage for your specific lot on file.
Do you have issues with water drainage on your lot? If so, we’d love to hear about it and try and help.


Hello. What do you think would be the best way to resolve a drainage problem on concrete in front of a side door? There is a planter alongside the house to the side of the door, but only on one side. The other is concrete. I’m not sure if providing drainage under that planter would be enough or if I need to break out concrete and put in a drainage channel. Any thoughts would be appreciated. Thanks!