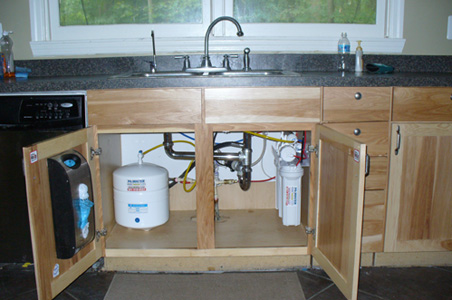
Under-Sink Reverse Osmosis Installation and You
1 Comment | Posted by armchairbuilder in Great Products, Save Money
Guest Post by Christine Cooney
Under-sink reverse osmosis systems have become increasingly popular as an alternative to bottled water or simple tap-mounted or pitcher filters – they offer a constant source of fresh clean water from the tap without the taste issues or concerns about contaminants in your drinking water. While a whole-house reverse osmosis system installation is a job best left to professionals, a DIY or handyman type should be able to readily install an under-sink reverse osmosis system. While instructions vary from system to system depending on the manufacturer, the general procedure is fairly uniform in terms of installing the tank and faucet.
Tools Needed:
Drill with varied-size bits
Philips screwdriver
Razor blade
Adjustable wrench
Installation Steps:
- You’ll need to clear out the space under your sink and make room for the reverse osmosis unit and storage tank. Depending on the system and space available, horizontal or vertical mounting may be possible
- Shut off the water supply to your house (or if you have a shutoff valve to the kitchen you can use that)
- Locate the cold water line under the sink – this is where the reverse osmosis unit will connect to your water supply
- Attach a new valve with a “T” – this new valve will connect the cold water line to the reverse osmosis unit
- Install the drain pipes and hook them up to the reverse osmosis system – a reverse osmosis system needs to be connected to your sink’s drain in order to dispose the impurities it filters out of your water
- Install the faucet. Bear in mind that this may require drilling a new hole in your sink or counter, depending on where you want to place the faucet. Porcelain and cast-iron sinks require specialized tools which may necessitate that you contact a professional, but standard stainless steel, wood and ceramic tile can be drilled with the appropriate bits
- Install the reverse osmosis unit and hook it up to the faucet, drain and cold water line as needed
- Turn on the water and activate the reverse osmosis unit. Run the unit to check for leaks and to help flush out any impurities in the system remaining from the manufacturing process
Again, the individual steps may vary depending on the system you’ve chosen to use but an under-sink reverse osmosis system can be readily installed by a homeowner with some inclination towards DIY.
Christine Cooney is a home improvement enthusiast and blogger who writes about a variety of DIY home improvement topics including reverse osmosis installation.


This is a pretty straight forward and simple installation procedure compared to what most reverse osmosis systems require. I guess the system you had installed already had everything attached where mine did not.