HVAC Rough-in
0 Comments | Posted by armchairbuilder in Build Your Own Home, Owner-Builder, Quality Check
How to Build a Home, Step 36
For those who choose a forced air heating and cooling system for their new dream home, the installation begins with the ductwork. It’s important to get the HVAC installation right to maximize energy efficiency and comfort. Here in step 36 of our How to Build a Home series of articles, we share professional builder tips for making sure your installer gets it right. If you’re interested in seeing the previous 35 home building steps covered, type how to build a home in the search box in the upper right corner of this page.
What Can Go Wrong?
If I hire a professional trade contractor to install my heating and air conditioning I shouldn’t have any problems right? Ideally, this is true. Unfortunately, this describes a perfect world. Armchair Builder was contacted a few months ago by a new homeowner who was having trouble keeping their home at a comfortable temperature. Believe it or not, this was a newer home in Cincinnati. So don’t assume you will be fine as long as you hire a professional to do the work. Here are a few things that can go wrong.
- Uncomfortable Rooms – One of the challenges in designing a heating and cooling system is to make certain the home is a consistent temperature throughout…even when the interior doors are closed.
- Inefficiency – Over sized furnaces and air conditioners can really hurt your utility bills. And just because your system is over-sized, doesn’t mean it will be comfortable.
- Unhealthy – Ductwork placed in unconditioned space can lead to condensation…which can lead to mold. Getting mold in your ductwork is like toxins getting into your bloodstream. These allows the bad stuff to circulate throughout.
Our friend in Cincinnati has two out of the three of these problems…and a “professional” company did the installation. Let’s look at some ways to protect yourself to make sure everything is done correctly.
Preparation
Make sure your heating and cooling contractor creates a properly designed system before any work begins. The design should take into consideration things like types of insulation used in walls and ceilings, number of windows with their specifications and locations, local climate, house orientation,…etc. There are many ways to create this design…one option is called a Manual J calculation. Whether it’s a manual J or some other computer program, make certain your HVAC contractor creates a design based on your specific project details. Some old school designers use a “rule of thumb” calculation based on the square footage of your home. These can get you into trouble and there’s no good way to change your ductwork after the home is built.
It’s a good idea to have your HVAC contractor meet with your plumbing contractor after the home is framed up and before any plumbing or ductwork is installed. This allows the two companies to discuss where drains and ductwork will go to allow everything to work. Every builder has been involved in a few disputes between trade contractors over wall space. This meeting is even more important with the open concept house plans of today. As interior walls are eliminated, the locations to run ductwork and plumbing become scarce. Remember, we don’t want these items to be installed on exterior walls. Ductwork installed on exterior walls and in unconditioned space will be inefficient, may create condensation and mold, and will leave cold or warm spaces in your new home.
Quality Check for HVAC Rough-in
There are some major items to check in any new ductwork installation.
- B-Vent Clearance – The b-vent is the vent that removes the by-products from gas powered hot water heaters and furnaces. Make sure there is a mininum of one inch clearance around the pipe. This pipe can get extremely hot and this clearance helps prevent possible fires.
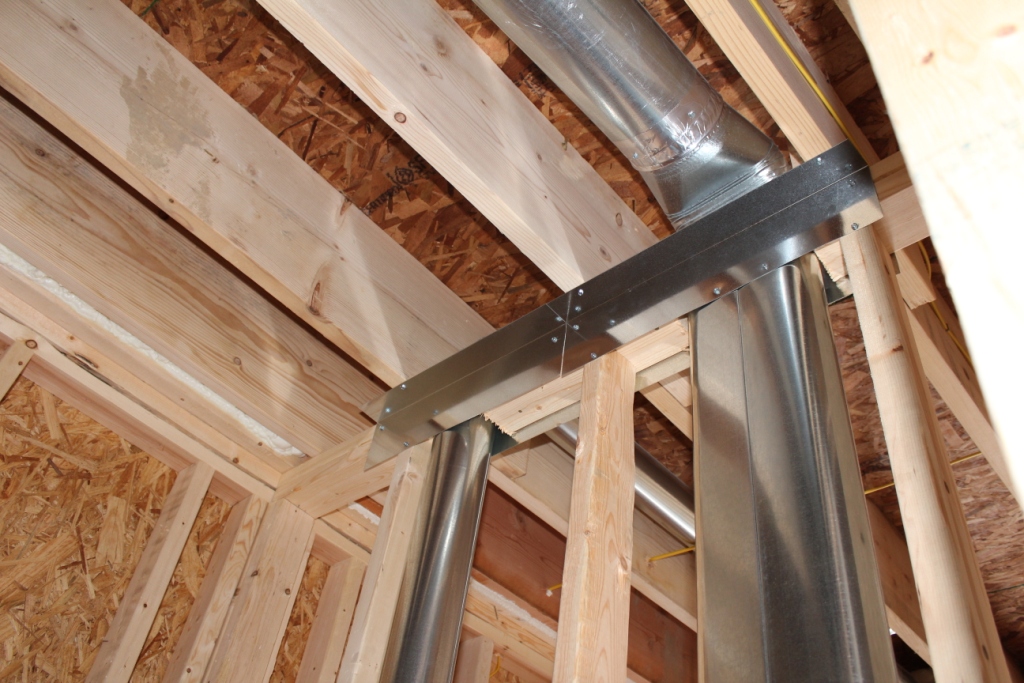
- Firestopping – Make sure your HVAC contractor provides a fire stop where the b-vent goes through each ceiling. This will typically be sheet metal around the pipe that will help prevent the spread of a fire to the floor or attic above.
- Floor Joists – Check that all floor joists are cut per code and manufacturer recommendations. If manufactured I-joists or floor trusses are used, make sure manufacturer recommendations for cutting are strictly followed.
- Roof Flashing – Make sure b-vents at the roof were properly flashed to prevent water infiltration. This is the responsibility of the heating and cooling contractor.
- No Exterior Walls – All cold air returns and supply heat ductwork should be located on interior walls. This prevents degradation of the efficiency of the system. When ductwork is installed on an exterior walls, insulation is compressed or non-existant. These ducts take on the outside temperatures creating problems. When there are no interior walls available, the best option is typically to add a chase on the inside of the home to conceal the ductwork.
- No Ductwork in Unconditioned Attic – No ductwork should be installed in an unconditioned attic for the reasons mentioned above.
- Vents – Varify bath and dryer vents are installed per plan and terminate to the exterior (not attic space)
- Ductwork Seal – Your contractor should have sealed up all seams in the ductwork to prevent leaks. The best options for sealing them are mastic or foil tape. Actual duct tape tends to come loose over time.
- Inspection – Confirm with your HVAC contractor that the local municipal inspector has approved the installation. Look for a sticker or paperwork with the approval of the building department.
- Warm air vent locations – Check all floor vents are in appropriate locations. We don’t want floor vents in the middle of the floor or centered on doorways.
- Rangehood Vent – Confirm the HVAC contractor has installed the vent for the rangehood based on the manufacturers specifications.
- Framing – Review all top and bottom plates on walls to make sure structural integrity is good. Contractor should have placed metal “L” brackets to reinforce top and bottom plates where necessary.
- Thermostat Location – Make sure the thermost wire is installed per plan away from all doors and windows. If the sun hits the thermostat, it will get inaccurate temperature readings and cause the home to be uncomfortable.
With a carefully thought out design and a detailed installation, your new home’s heating and cooling system will be efficient and comfortable for years to come. If you are thinking about building your own home, stop by our How to Build Your Own Home resources page for some detailed videos, articles and one-of-a-kind digital resources.


