One of the best things about building a new home is that you get to include high quality details to create a building that will last for many, many years. The roof is one of the key elements to a home that helps prevent moisture damage and possible mold problems. To build a quality roof on your new home there are some specific items that need to be included in the design and contracts with trades. Here we take a look at a few photos that show some of the more important quality roof details so owner builders can be sure they are included in their new dream home.
Valleys
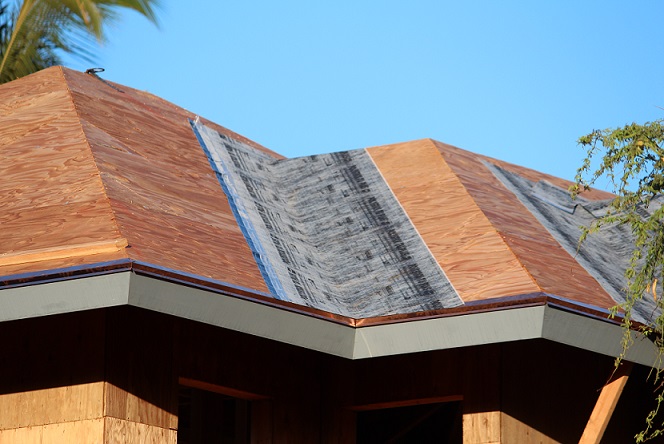
A roof valley is the intersection of two planes of the roof where water is directed. These valleys are responsible for channeling water down and off the roof. Because of the nature of the valley, in that it carries large quantities of water, it’s susceptible to leaks. In order to help prevent these, many builders use a rubber underlayment material secured to the roof deck under the valley (see photo above).
Drip Edge
Do you see the shiny copper edging on the photo above at the roof edge? This is commonly called a “drip edge.” This material can be made of aluminum, plastic, copper…etc. and it’s function is to allow the water to drip off the roof edge without going back under the roofing material.
Underlayment at Wall
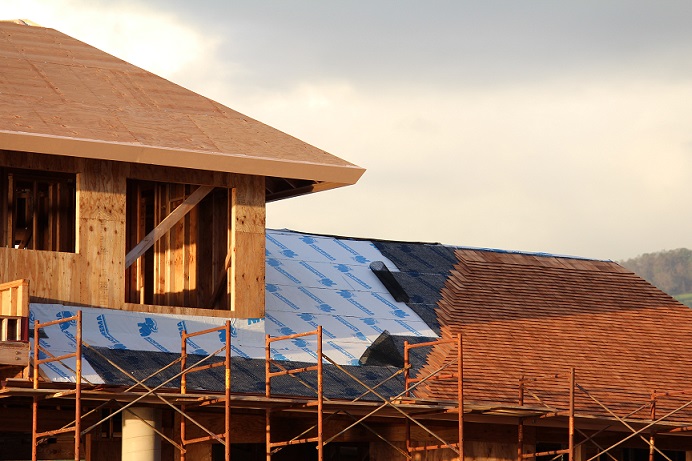
A quality roof can only be created when a proper seal is made at the walls it intersects. In other words, you can create a great looking water-tight roof but it’s no good unless it works with the wall adjacent to it. We see in the photo above a roof with rubber underlayment being installed under the wood shingles. This rubber material has a backing that is removed to reveal a sticky material that allows the roofing contractor to adhere it to the plywood roof deck. Now keep in mind, water runs down the siding on the walls adjacent to the roof and sometimes gets behind the siding material. Without a proper seal at the roof to wall intersection, a leak will occur. So one quality roof detail used to prevent leaks at the intersection of the wall and roof is to run the rubber underlayment up the wall.
Quality Roof Flashing Details
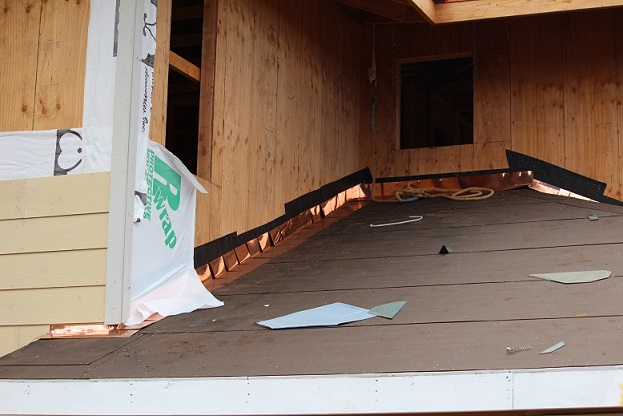
So we know rubber underlayment can be run up adjacent walls to create a quality roof, but what about the rest of the roof-to-wall details? Because this is such an important part of a quality roof installation, let’s take a look at how this intersection should be finished off properly. In the photo above, we see the black roof underlayment has been extended up the wall first. Next comes the flashing, sometimes called shingle tins. In this case, the flashing is made of copper but it can also come in aluminum and various other materials. These shingle tins are laid down and overlap each other as they are installed up the roof slope at the wall intersection. Next, the weather resistive barrier (a.k.a. housewrap) is placed on the wall so it overlaps the flashing. With this overlap, any rain water that gets behind the siding material will run down the face of the weather resistive barrier and out over top of the shingle flashing instead of behind it. Next the shingles can be installed and finally, the siding material.
A quality roof can be achieved by paying attention to these small details during planning and installation. If you’re ready to start planning your new dream home, be sure to stop by the Armchair Builder e-Store for some pro builder products that will help you save money and build a quality project.


